

How To Make A Wall Chart For Household Chores
Teaching children responsibility and helping them learn to do chores as part of their daily routine can be a challenge at the best of times. That’s why we love this chore wall chart idea. It’s a simple concept for your child and they can easily see which chores are still to be done.
If you give your child pocket money in return for chores, this is a great way to track their progress. Try this fantastic chore chart tutorial from My Name Is Snickerdoodle at home…
You Will Need:
6x12 piece of coloured card stock
A trimmer with a score blade
Magnetic sticky paper or thin magnetic sticky strips
Images cut into 2x2 squares
Chore description printed and cut into 1 ½ x 1 ½ squares
DONE printed 6 times and trimmed to fit
Glue
Corner rounder
1. Score your paper lengthwise at 3 1/4 inches.

2. Your paper will now be divided 3 1/4 and 2 3/4. On the 2 3/4 side cut up to the score line every 2 inches. This will create 6 front flaps.

3. Fold each of those flaps up.

4. Using your corner rounder, round the top two corners of each flap.

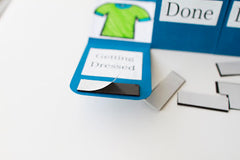
5. Adhere your images in the order you would like to see them done. You will want to glue them close to the score line.

6. Adhere each of the descriptions onto the inside centre of each flap.

7. Cut your magnetic paper or strips into small rectangles about 1 1/2 long. Place two right sides together. Peel off the sticker of one and place on the bottom of the flap.

8. Peel off the sticker of the top magnet and fold the flap up to place the top magnetic strip. This will ensure that you've placed both pieces in the correct spot so they "stick" together.
9. Repeat step 8 until it’s all done.

10. Adhere each 'Done' onto the centre front side of the flaps.

- Place somewhere in the house where it's easy for your child to access and see. Put up with 3M sticky stuff or tacks and your ready to go!
